Symmetric Spinnaker Flow Control
In the previous issue we visited Cornell University’s wind tunnel to see how wind flows around an asymmetric spinnaker. We learned a lot, of course, especially the importance of being dynamic with our trim, so we went back to the tunnel to explore some key points of symmetric spinnaker flow and trim.
Before stepping into the tunnel, I had a naïve vision of attached flow on both sides of the spinnaker. What I quickly discovered, instead, was that the smoke showed large areas of stagnation and early flow separation. Thinking our 3D printed plastic test spinnaker was too rigid, or its shape flawed, we went out and placed telltales on my J/24 spinnaker. Our real-world tests confirmed our wind-tunnel findings: The flow is there, but it’s less than ideal. The difficulty in getting flow to go the way we want, and keeping it attached as long as possible, emphasizes how important and attentive trimming really is.
Flow goes in a remarkably different direction in reach mode than it does in run mode. In reach mode, the wind flows roughly horizontal, entering the luff (windward, pole side) and exiting the leech (behind the main). In run mode, wind flows vertically, entering near the head and exiting from the foot. This is why, in strong winds, we see wind ripples on the water in front of the bow. There’s often a misconception about these basic flow concepts, particularly with run-mode, top-down.
Reach to VMG Downwind
With predominantly windward-leeward courses, reach mode is used in lighter winds to sail angles downwind to VMG. The basic flow experienced is from luff to leech horizontally across the spin. Keeping in mind this cross flow, here’s some guidance to achieve a good downwind VMG reach-mode shape.
Pole angle: Set the pole perpendicular to the apparent wind, and then a fraction aft of that. Use the masthead fly as a reference. In a lull, the apparent wind moves forward because the boat carries momentum, and its component of the apparent wind becomes bigger. When this happens, the pole needs to be eased forward for a short time, until the boat slows, and then readjusted once the driver finds the new wind angle.
In a puff, the pole won’t need to be moved much. Instead, the driver will be able to sail deeper as the boat accelerates. Once into the new angle, the pole will be able to be moved aft as the spinnaker is shifted to windward for the lower, VMG course. With the sheet trimmed correctly, the foot should have shape to it. If the foot looks too round, the pole is likely too far forward. If the foot is flat, or stretched, it’s too far aft.
Pole height: Pole height sets the spinnaker’s luff tension. Set the topping lift so the “tack” is slightly lower than the clew. A low pole tightens the luff, making the wind’s entry angle more consistent while keeping the draft forward and the leech open. Lowering it creates a shape that’s a little more like an asymmetric spinnaker. Because the spinnaker hangs on its weight, the luff falls in lulls and rises in puffs, so the topping lift will have to be adjusted to keep the height low relative to the clew as conditions change. The luff should break evenly along the leech, from top to bottom. If the pole is too low, the luff will be very sensitive to trim. If it’s too high, the top of the leech will curl well before the rest of the sail.
Sail trim: Starting from the luff, encourage flow toward the leech on both sides. To optimize attachment, trim so the luff barely curls all the time, indicating the front edge of the luff is parallel to the wind to get flow started on both sides. Trimmers often take this too far by trimming too loose with a lot of curl. Wind tunnel-results show under-trimming inhibits flow over the windward side of the spinnaker. Over-trimming results in early separation along the leeward side.
Apparent-wind angles change in reach mode, even in steady winds, so the sheet needs to be trimmed constantly to test the edge of this curl. It’s better to anticipate and make consistent small changes to trim so the sail is always at the edge, rather than reacting late and having to make substantial changes. A quiet ratchet block, a sheet with lots of intermittent large trims, lots of curl or no curl at all are all signs of sheeting incorrectly. Just a hint of curl with constant yet small clicking from the sheet ratchet is perfect.
Heel angle: Keep the boat flat, or heel it a little to leeward. With a flat boat, gravity brings the spinnaker to windward, which is good. Some boats do need a little heel to reduce wetted surface area and to balance the helm. If it’s really light, the main and spinnaker tend to fall in on themselves if they’re too flat, so extra heel may be needed to use gravity to help keep shape in both main and spin. You can’t go wrong with a perfectly neutral helm, and it’s always fast to keep the heel such that the tiller is dead-centered in the boat.
The mainsail: In reach mode, the spinnaker is helping direct flow through the slot between itself and the main. The main is therefore integral to the working of the spin. The apparent wind is further aft at the top of the main because the true wind is stronger up there, thus the apparent-wind vector is moved aft. Set the vang so the top batten is angled just slightly outboard of parallel-to-the-boom. Don’t set it and leave it: Puffs will open the leech so more vang will be needed, and it will need to be eased for lulls. Also, trim the main so it’s not luffing. My default is to ease until I see luff or back wind, then trim in until any luff is solidly gone. If there’s a big change in the spinnaker sheet, then a big trim in mainsheet is probably due, too.
Steering: While sailing wide angles to optimize VMG downwind, the driver is always steering as low as possible without losing too much speed. To do so, the driver is steering a lot trying to keep the apparent-wind angle constant. Essentially, the boat is heading up in the lulls and down in the puffs. In puffs, the boat accelerates and the apparent wind goes forward, allowing deeper sailing angles while keeping the apparent-wind angle about the same. A lull slows the boat, bringing the apparent wind aft, requiring hotter angles to keep the apparent wind the same. Even a small difference in wind can make a big difference in driving angle, so the steering angle is perhaps even more important than trim in this light-air, downwind reach mode.
When the wind is strong enough to lift the weight of the spinnaker up and away from the boat you’re switching into run mode. Spinnakers are designed with shape up top and an open foot, so in downwind mode, the wind can start its journey up top and escape out the bottom. With the top-down flow concept in mind, let’s explore our tools in run mode.
Pole angle: Experiment with moving the pole aft of the apparent-wind being perpendicular to the pole. The idea is to get it rotated to windward and away from the main’s wind shadow.
Pole height: Set the topping lift so the luff clews are parallel to the water. In this mode, the boat will be heeled to weather, so relative to the boat, this will mean the luff clew is higher than the leech clew, yet relative to the water, the clews are the same height off the water. Your go-to guide is to have the sail’s center vertical seam perpendicular to the horizon, independent of the amount of heel.
Sheet trim: Trim a little bit tighter than curl. The trimmer can ease to luff curl occasionally to make sure it’s in the right range, but ultimately the spinnaker should look symmetric. The challenge is to balance trimming hard enough to get the spinnaker clews spread to get projected area while still ensuring the foot is loose enough for air to escape. These two concepts are contrary to each other, so experimenting is necessary. Apparent wind angles don’t change as radically as they do in reach mode, and it’s not as important to keep it at the edge of curl, so the changes in trim are much more subtle. Lots of curl, a stretched foot, and lots of big sheet movements are all signs that something is wrong.
Heel angle: In run mode, we heel to windward so the spin hangs down vertically from the mast and therefore out from behind the main. It also can reduce wetted surface area. On most boats, I like it best when we heel enough to windward to create a little helm pressure. It’s about right when I have gentle weather helm and the masthead fly shows the main is only covering a small amount of the spinnaker’s upper leech.
Because the two modes have different setups and trims, recognizing when to be in true run mode versus when to use reaching mode to VMG down a run is not easy. The decision is made be by feel. On our boat, if we are in reach mode and the wind increases enough that I think we can transition to run mode, I bear off and ease the main. The team rolls the boat to windward while the trimmer raises the pole and shifts the spinnaker to windward out from behind the main. When in light run mode, if I feel stagnated wind on my neck and can sense the boat decelerating, I head up onto reach mode. If there’s a big enough wind change to warrant a transition to/from either mode, the pull on the sheet changes significantly, so our trimmer and I are often advocating switching modes at the same time.
Another excellent clue is the shape of the spinnaker. When fully supported with pressure, the spinnaker flies high, which is a sure sign to be in run mode. When sagging, it is time to go high onto VMG reach mode. If we can’t decide which mode, we default to reach mode because high and fast is not a disaster.
I find the lighter the boat, the more radical the transition. A dinghy might be in the VMG reach downwind mode with the pole forward to the forestay, but just one more knot of pressure and downwind run mode pays. Keelboats, however, have a longer transition with the pole incrementally going aft over a significant range as the wind increases. The heavier the boat the windier it needs to be to get into the true top-to-bottom flow of run mode. These transitions need to be decisive and well choreographed with the team because the boat cannot get stuck between modes.
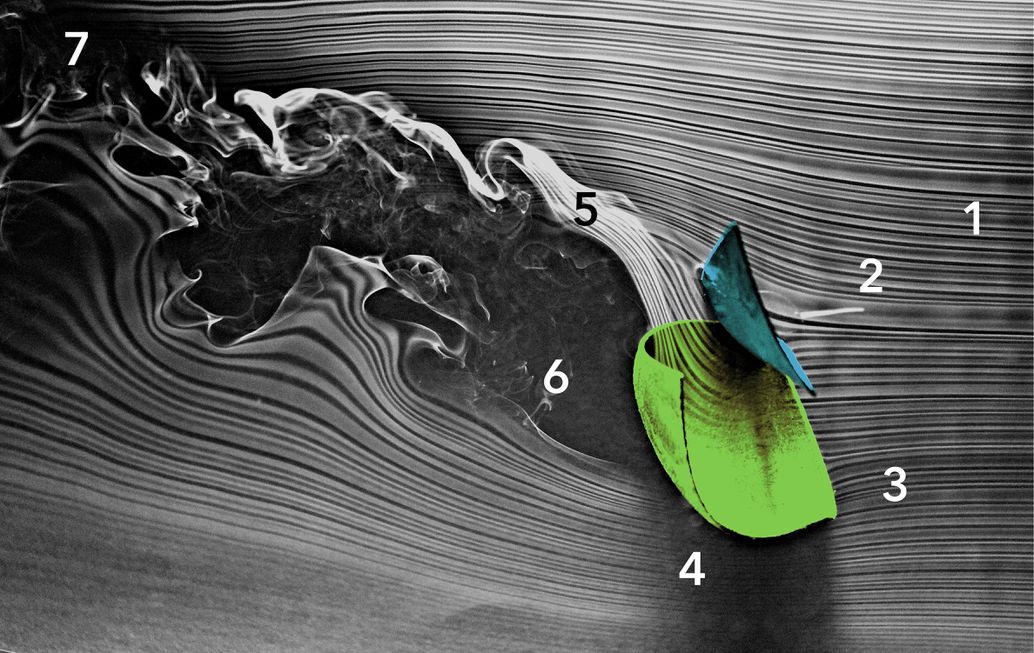
Here’s what we see in the wind tunnel when the 3D sail is trimmed on a reach, with the apparent wind at approximately 90 degrees (viewed from the bottom of the sail plan).
1. Smoke source: A horizontal line of smoke flows across the main and spinnaker, about halfway up the mast.
2. Support to hold the 3D printed mainsail and spinnaker in place during tests.
3. Wind attaches to the spinnaker and splits, flowing along both sides of the spinnaker (green) and mainsail (blue).
4. Backside spinnaker flow: The wind attaches to the back of the spinnaker for about half the distance to the leech before it detaches.
5. Movement in the slot: On a reach, the wind flows across the face of the spinnaker, keeping flow attached all the way along the back of the main. Wind flows across the spinnaker, not downward from head to foot, as it does on a run.
6. Stagnation is the area where separation happens behind the spinnaker.
7. Note how the flow is turbulent for quite some distance to leeward and behind.
The driver is constantly experimenting with sailing as close to dead down wind as possible without loosing speed. If it’s marginally windy enough to be in run mode, slightly hotter angles need to be sailed, or the boat stalls. As the wind gets strong enough to be solidly into the downwind mode, angles can be almost “DDW.”
I look at my masthead fly to see if it the main is blocking the spin or not. If it is, I head up until the wind has a clear shot. My trimmer is usually barking, “Head up 5 degrees” anyway because what I see with my fly he feels as no pull on the sheet. Conversely, as the wind increases, the wind holds the spinnaker up better and we are able to shift it to windward away from the main and I can bear off, with my fly showing my main is not shadowing the spinnaker, and my trimmer says, “Down 5.”